Guitar Lesson: Beginner Guitar Chords Part 1
by David Bruce
N.B. Before starting this lesson, you may want to visit the Guitar Tuning Guide.
If you're picking up the guitar for the first time, this is the lesson for you!
By the end of this 2-part lesson, we'll have you playing 'Show Me The Way To Go Home' and your journey of musical discovery will have well and trully begun - BON VOYAGE!
Let's plunge straight in and learn the names of each of the six strings.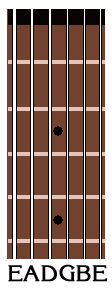
On the guitar the highest-sounding strings are nearest the floor, and the lowest-sounding nearest your head. The lowest-sounding string is the one closest to your head and is also the thickest string on the instrument - the low E.
Moving upwards in pitch, but downwards in space, we have A, D, G, B and finally a high E. Try to memorise these pitches and their order.
Maybe invent a funny saying, like 'Elephants All Dine Generally Before Eight' to help you remember (I just made that up, by the way).
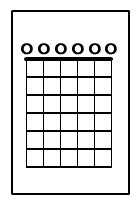
A lot of guitar music is written down using a chart to represent the neck of the guitar. The six strings above are shown like this:
What do those circles mean at the top?
They tell us to play the open string.
Before we learn our first chord, we need to learn about frets. Frets are the vertical metal bars that run across the guitar neck underneath the strings.
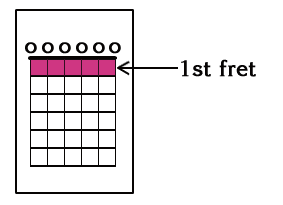
The spaces between these are named in numerical order starting from number 1, nearest the neck.
When you put your finger on the string to play a note, you will usually place it just behind the fret.
Remember this later on - if you get the old 'beginner buzzing', chances are, one of your fingers is too far away from the fret.
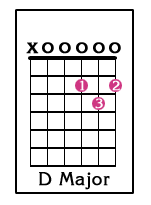
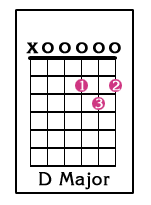
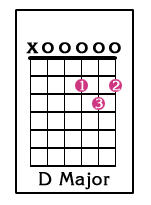
The first chord we're going to learn is called D major.
We'll use three fingers to play this chord - the index, middle and ring fingers. We're going to call them fingers 1, 2 and 3 respectively.
Now, place your fingers on the guitar strings as shown and give it a strum :
Things to watch out for
Now let's put the chord to some use.
Jam along with the track strumming the D chord in time with the music.
Well done! You've reached the end of part 1.
If you enjoyed that, feel free to go straight on to Part 2..
If you're picking up the guitar for the first time, this is the lesson for you!
By the end of this 2-part lesson, we'll have you playing 'Show Me The Way To Go Home' and your journey of musical discovery will have well and trully begun - BON VOYAGE!
The 6 Strings of the Guitar
Let's plunge straight in and learn the names of each of the six strings.

On the guitar the highest-sounding strings are nearest the floor, and the lowest-sounding nearest your head. The lowest-sounding string is the one closest to your head and is also the thickest string on the instrument - the low E.
Moving upwards in pitch, but downwards in space, we have A, D, G, B and finally a high E. Try to memorise these pitches and their order.
Maybe invent a funny saying, like 'Elephants All Dine Generally Before Eight' to help you remember (I just made that up, by the way).
Chord Charts

A lot of guitar music is written down using a chart to represent the neck of the guitar. The six strings above are shown like this:
What do those circles mean at the top?
They tell us to play the open string.
All about frets
Before we learn our first chord, we need to learn about frets. Frets are the vertical metal bars that run across the guitar neck underneath the strings.

The spaces between these are named in numerical order starting from number 1, nearest the neck.
When you put your finger on the string to play a note, you will usually place it just behind the fret.
Remember this later on - if you get the old 'beginner buzzing', chances are, one of your fingers is too far away from the fret.
Your First Chord

The first chord we're going to learn is called D major.
We'll use three fingers to play this chord - the index, middle and ring fingers. We're going to call them fingers 1, 2 and 3 respectively.
Now, place your fingers on the guitar strings as shown and give it a strum :
Things to watch out for
- Notice the 'x' on the low E string. This means when you strum you should try not to play this string.
- Try not to let your ring finger (number 3) collapse. If it does it will touch the E string and deaden the sound.
Jam Session
Now let's put the chord to some use.
Jam along with the track strumming the D chord in time with the music.
| First listen to the track including the guitar chords: | |
| Then play along yourself: | |
Well done! You've reached the end of part 1.
If you enjoyed that, feel free to go straight on to Part 2..


